If you’re planning an extension or renovation, or if you’re a developer looking to add value to your projects then you may be considering wiring your home ready for ceiling speakers.
Ceiling speakers offer a great audio experience, they are discreet, sound great and add a lot of salability to your home.
At this stage you might not know what type of ceiling speaker system you want to install, but perhaps your first fix stage is looming and your electricians are chasing you for more information on the speaker wiring.
But don’t worry, this blog guide will outline the three main speaker wiring methods to prewire your home as well as highlighting a few mistakes you can easily avoid.
Read on to learn the tricks of the trade...
Contents:
- Speaker Pre Wiring Methods
- Optional Extra Wiring
- Things To Watch Out For
- Specialist Wiring
- Central Wiring = Multi Room System
- Four Speakers On Plug & Play
- Four Speakers On An Amplifier
- Covering All Bases
- Conclusion
Speaker Pre Wiring Methods
Method 1 - Local Amplifiers
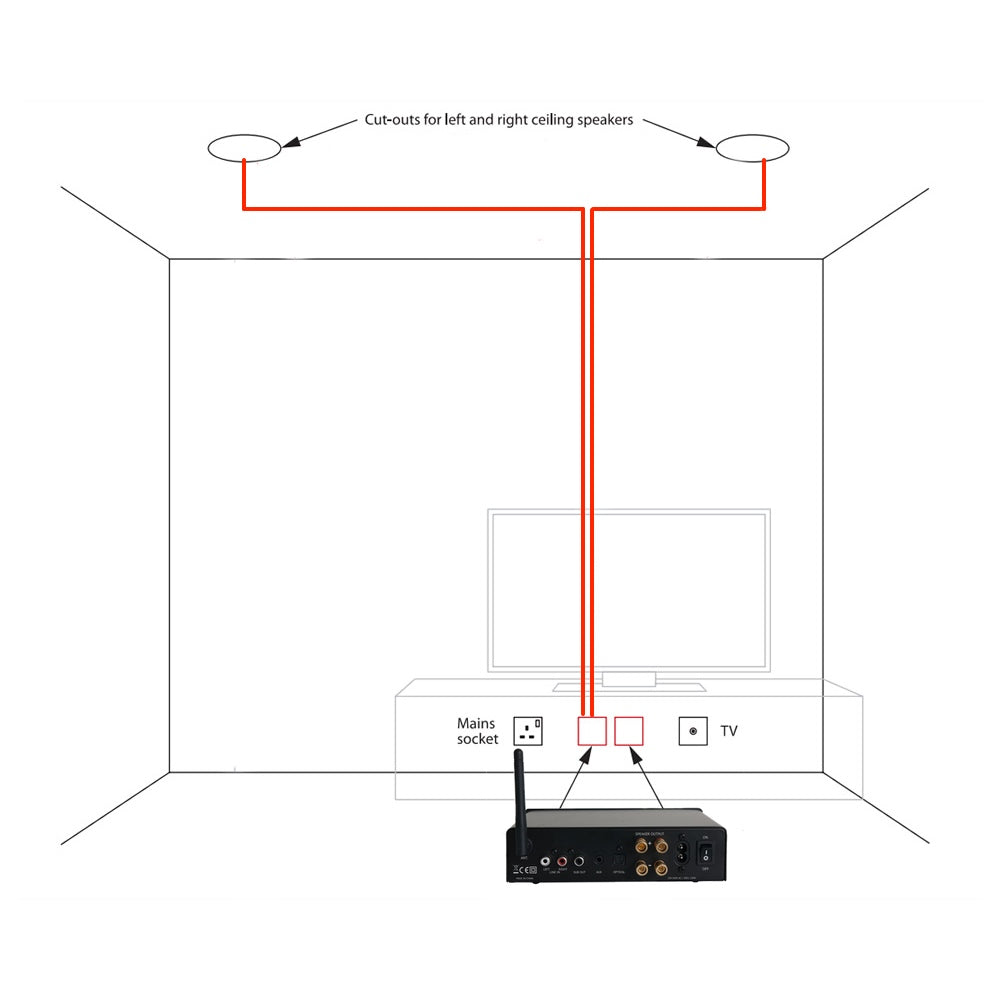
Most HiFi amplifiers will wire out to ceiling speakers using two core speaker cable. It’s quite common to keep the amplifier within the room, installed in a kitchen cupboard or on AV equipment / TV stand etc.
This is particularly good and essential for Bluetooth systems including WiFi multi room systems with Bluetooth. That’s because Bluetooth range is usually up to 10 metres so the amplifier should be kept close to the listening position.
This type of wiring is ideal if you’re only adding music into one room. We recommend the Tangent Ampster BT II Bluetooth amplifier which can be homed in a cupboard and controlled via your smartphone using Bluetooth.
If you’re adding a Bluetooth & WiFi multiroom amplifier such as the Adastra S260 then we’d also recommend installing a wired network point from your router to the amplifier position, this will give the absolute best network connection and reliability.
Pros:
- Easy To Wire With Minimal Cabling
- Lots Of Amplifier & Speaker Options
- Versatile - Bluetooth, HiFi, WiFi Multiroom - Most Will Work
Cons:
- You Need A Location In The Room To Mount Amplifier
- Unable To Replace In Future With A Multichannel Amplifier
Suitable For: Any separate amplifier + speaker system, WiFi multi room systems.
Method 2 - Central Amplifiers
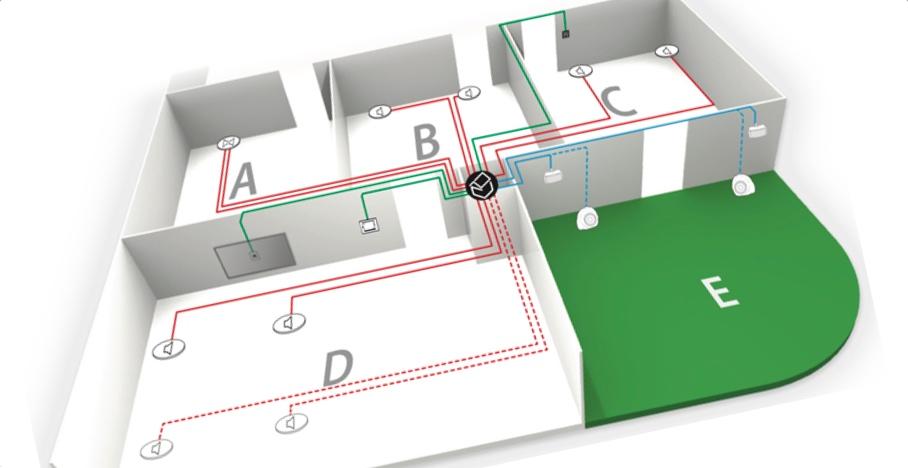
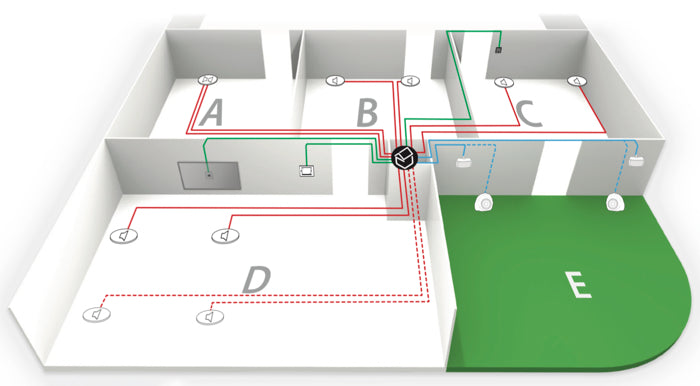
It’s quite common to wire each ceiling speaker back to a central location such as under the stairs, in an A/V rack somewhere or in another suitable central location.
You simply wire from each ceiling speaker back to the amplifier position. Each zone will require an amplifier (or if using a speaker distribution system then a speaker selector switch).
You can daisy chain up to two pairs of speakers in one zone. For instance in the kitchen you may have two pairs of speakers, you can wire from the amplifier to the first pair and then the first pair to the second pair. All speakers will always play the same music but it cuts down on speaker wiring.
Bear in mind that you’ll need to control the amplifiers so central amplifier systems are most commonly WiFi multi room systems such as Sonos or Denon HEOS which can be fully controlled from your smartphone.
We do not recommend installing Bluetooth amplifiers centrally as they typically have a range of up to 10 metres and often transmit the same Bluetooth name, so if you can actually get a connection from the listening position you may be connecting to the wrong amplifier. Bluetooth is great for local music only.
If you are happy to go to the central location to control music then you could consider a speaker distribution system consisting of a larger power amplifier and a speaker selector switch. These wire up in the same way, but connect a little differently, we’ll cover that in another blog!
Pros:
- Flexible - Use any brand of multiroom amplifier & ceiling speakers
- App Controlled - Control music & volume from your smartphone
- Easy To Upgrade / Replace In Future
Cons:
- Most Expensive Option
- No Bluetooth (means no YouTube!)
- More Speaker Cable Required Than Local Systems
Suitable For: WiFi multi room systems, distributed speaker systems with speaker selector switches.
Method 3 - Plug & Play - Local Rooms
Our final method, and one that is increasingly popular, is the plug & play all in one ceiling speakers!
This concept was introduced to the market around 2017 by a brand called Lithe Audio and has been followed since by Adastra and a few other brands on the market.
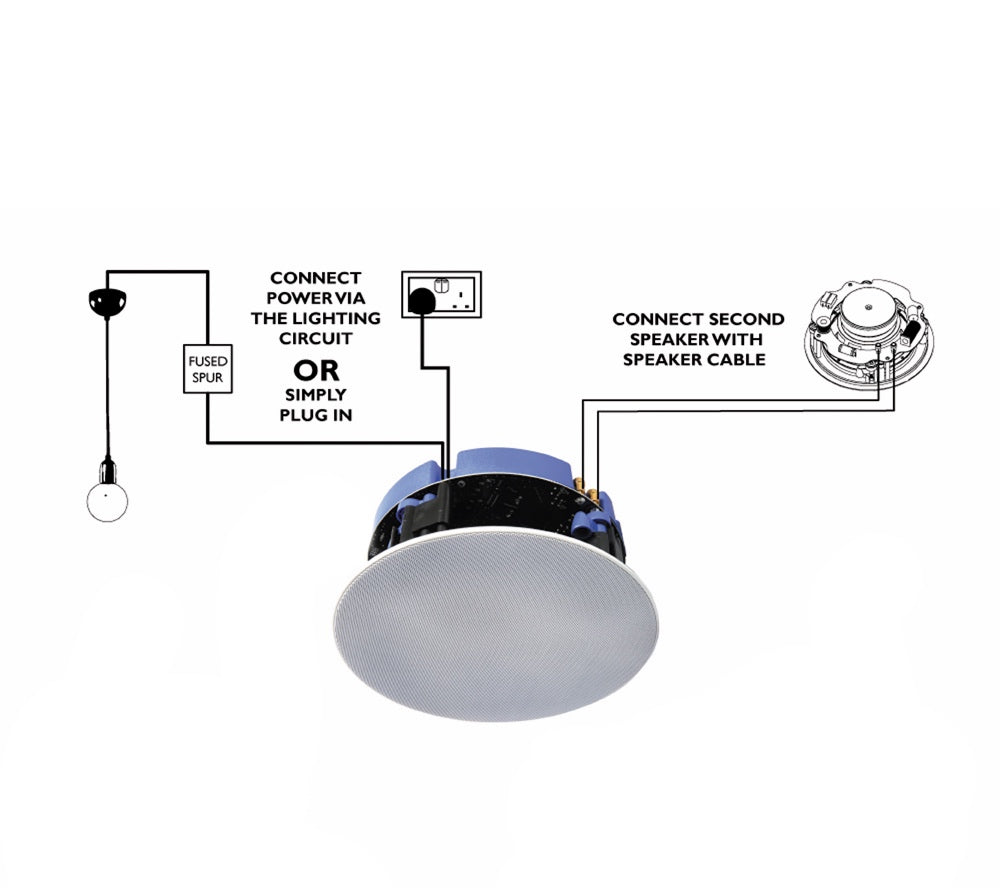
The Lithe Audio 6.5” ceiling speaker includes a built-in 50W amplifier and Bluetooth receiver.
You simply connect the master speaker to a power supply, which can be your lighting circuit, then connect the second slave speaker into the master with speaker cable.
These are super easy to pre-wire for as you simply need a power feed at one speaker position and then a standard 2 core speaker cable between both speakers.
If you’re simply adding music to one room, or you want an easy to use and low maintenance system then this is the way to go.
Another plus point of these, particularly for developers/builders/hotels/airBnB/etc is the fact that these are super easy to use from any Bluetooth enabled smartphone or tablet and very reliable which means you’re unlikely to get any call backs or queries from the end-user. Simply pair and play like a standard portable Bluetooth speaker.
Pros:
- Quick & Easy To Install
- Cost Effective
- Easy To Use
- Ability To Upgrade Bluetooth To WiFi Multiroom Plug & Play Speakers (Lithe Audio)
Cons:
- No Ability To Replace With Centrally Mounted System
- Limited To Speaker Quality / Size Of The Plug & Play Speaker
- Rooms With More Than 2 Speakers Can Be Costly & Require Specialist Cables*
Suitable For: Plug & Play Ceiling Speakers Such as Lithe Audio
Optional Extra Wiring
All speaker systems will at the very least require a power supply and then speaker cables between the amplifier and the speakers.
However there are a few other additional wiring options that you might want to consider.
TV Connections

Most systems can be connected to a television. This is usually done by running an audio interconnect cable between the television and the amplifier.
You need to ensure that you install a good quality shielded cable and we recommend that it is no longer than 10M.
Make sure that you check your chosen amplifier has an AUX input and can control the volume from the TV.
You may also need a digital to analog converter (DAC) if your TV only has a digital output.
We have a comprehensive TV connection guide which you can read by clicking here.
Subwoofers
If you really like your bass then you might be considering a subwoofer.
Most people tend to go without the subwoofer, but it is easy enough to do on most systems.
Firstly you need to ensure that your chosen amplifier has a subwoofer output.
Then you simply install a subwoofer cable between the amplifier and the subwoofer position.
You’ll also need a 230V power socket to plug the subwoofer into.
FM/DAB Aerials
If you’re having an amplifier with FM/DAB radio then we’d strongly recommend pre wiring for a proper DAB/FM aerial.
This would usually be installed either in your loft, on your roof or on an external wall and wires back to the amplifier position using coax cable.
FM is quite easy to get a good signal however DAB is often a little harder to get, so if you’re in a low signal area then a proper external mounted DAB aerial may be essential.
Speaker Wall Plates
Another great idea, especially if you’re prewiring for future use, is to install speaker outlet wall plates at the amplifier position.
These are available for two pairs and four pairs on a single plate and connect to your speaker cables leaving a neat and tidy connection plate on the wall ready for connecting to amplifiers with speaker cables either using the binding posts or with banana plug interconnect cables.
Things To Watch Out For
Specialist Wiring
One thing you must be aware of is that in-wall amplifier systems such as the Systemline E50 and the Systemline E100 need some specific wiring.
These speaker systems wire in a different way to most conventional HiFi amplifier systems and multiroom audio systems.
If you are considering such a system you really need to make the decision BEFORE pre-wiring as these kits will come with special pre-made cables that you’ll need to install in the walls at the first fix stage.
Whilst it is possible to prewire for these systems without buying the kit, it’s not recommended and does require you to source individual cables which may go against your warranty. In short, we wouldn’t recommend pre wiring one of these systems and instead recommend that you order the kit ready for the first fix stage.
Central Wiring = Multi Room System
Bear in mind that if you install a centrally mounted system then you will need to use a WiFi multi room amplifier such as the Hamilton Audio, Denon HEOS or Sonos.
These systems require an amplifier per zone and as such these systems can be a lot more costly than Bluetooth systems.
It is not advised to install a Bluetooth based system centrally as you will likely have range issues and the system simply won’t work.
Four Speakers On Plug & Play
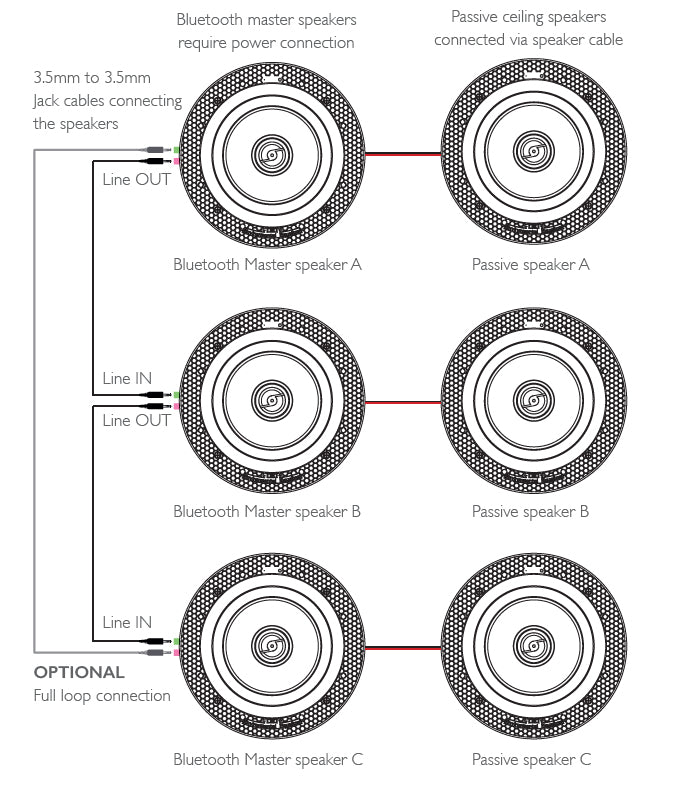
Plug & Play systems such as the Lithe Audio can be a bit more awkward to first fix as you need to install two separate pairs and then link them with a Lithe Link kit.
It’s not particularly hard to do but you will need to buy the Lithe Link kit (available separately) to install at the first fix stage.
If you are going to pre wire this then you'll need to allow for a 230v power supply to each master speaker then you'll need to purchase the Lithe Link kit to run in the ceiling at first fix stage.
You can install up to three pairs (six speakers) using this method, bear in mind though this is for one room as they will all play the same music at the same volume at the same time.
You'll also find a complete four speaker Lithe Audio kit here.
Four Speakers On An Amplifier
There are two ways you can wire four speakers to one amplifier when they are all playing the same music at the same time.
Option 1 is to wire from the amplifier to the first left speaker, then onto the second left speaker and vice versa for the right.
This cuts down on wiring but means you are unable to separate zones in future (usually not an issue)
Please note that due to amplifier limitations you cannot daisy chain more than two pairs (four speakers) in total on a system. Any more than four speakers will require a speaker selector switch to be installed by the amplifier.

Option 2 is to wire each speaker back to the amplifier.
This is also good if you may separate the zones in future by adding a second amplifier.

Covering All Bases
A little trick we often tell developers and builders, especially when selling the house onto someone else, or if you’re simply not sure which route you’ll take is...
wire for both method 2 AND method 3.
Whilst it may cost a small amount of money more to do this, and one of them ultimately won’t get used, it does allow you or the next homeowner to have almost any speaker system on the market in the future.
Conclusion
Hopefully now you have a better understanding of how to pre-wire your home for a ceiling speaker system.
There is no particularly right or wrong way to prewire your home. It’ll mostly come down to what type of system you want to install now or in the future.
When in doubt, wire for everything!
And don’t forget that whether you’re fitting in ceiling speakers, in wall speakers, bookshelf or satellite speakers or even outdoor speakers, the wiring is still the same and the methods are still valid.
If you have any questions or concerns about wiring your home please feel free to contact our expert team by email, live chat or by calling 02393 190955 and we’ll be happy to help you out.

